Ikea Hemnes cabinet hack: basic to designer!
A functional storage space is a necessity in every home, even more so when you have a narrow entryway. We all need something to liven up that area at the same time not take too much space.
 |
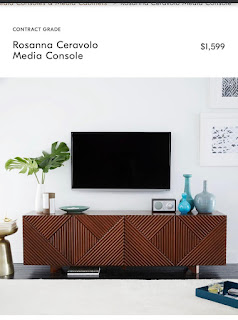
| My inspo for this design piece |
I loved this sideboard from west elm but did not get it for 2 reasons.
1. It was too broad for my entryway, I wanted something slimmer.
2. It was too expensive .
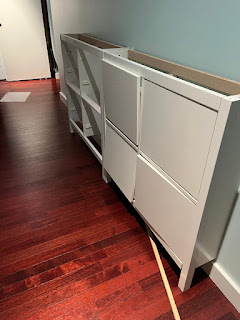
For this project I felt that the Ikea Hemnes shoe cabinets would be perfect. It has a small footprint and functional storage. However it has a very basic design and I wanted to update it to something more chic.
 |
| Ikea Hemnes Shoe Cabinet |
List Of things needed :
This project involved 2 parts.
1. Connect 2 ikea hemnes cabinets together to create a longer wall storage
2. Update the cabinet front with custom design.
part 1:
For the first part I assembled both the cabinets as per instructions. For the last part instead of putting the top shelf individually on both units, I got a larger wooden plank cut to size from lowes (84" length and 8.5" wide). I chose 84" because I wanted longer overhang, you can choose to go with 83 or 82 if space is a constraint. Put the two cabinets side by side and attached the plank with glue.
For the top shelf, I first sanded it, cleaned it and then prepped it with minwax prestain.
- Prestaining is necessary if you want uniform color absorption while staining the wood. I used a brush to apply the prestain.
- You want to be a little generous in your application. (Initially I wasn't and results were not so nice!)
- While staining you want long consistent strokes in the direction of the wood grain.
- Ensure you are wiping off the excess stain with a dry cloth.
 |
| Original Ikea cabinet assembly |
.jpeg) |
| ikea assembly with unfinished wood top |
Part 2:
Now comes the design part. I liked the west elm piece but when I imagined hemnes with similar design it felt too busy, so I created my own simplified design.
Hardware section
In order to create that design, you can use
a) half round wood dowels (which is what I did)
b) Foam dowels.
Wood Dowels you can get in any big hardware store like Lowes or Home Depot. Foam dowels you will find in art store like Michaels. For cutting wood dowels to desired length you can use hand saw or miter saw.
- For this kind of design I would recommend miter saw to save time and energy.
- Hand saw will give you cleaner cuts, no wood burning and lesser probability of dowel splintering (plus they are cheaper!).
- For either saw make sure you have fine toothed blade. minimum 60 teeth for miter saw or get a fine toothed Japanese hand saw . The default ones are not good enough.
- Cutting all the dowels for one cabinet and then moving on to the next one can be very tiring and time consuming. Faster way to do it is mark and cut same length 8 times and then move to next length. Same thing while giving angled cuts.
- you can use precut woods instead of 6 feet dowels.
- pros: can cut multiple dowels together
- cons: there can be more wastage of wood.
- While marking leave extra wood length on either side. You would lose that while cutting angles.
 |
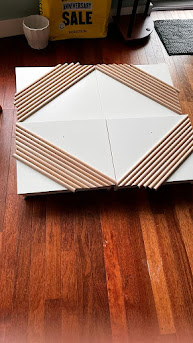
| cut pieces arranged in the pattern. |
One of the main challenges in creating this patterned design is figuring out what angles to cut the dowels to. I could go center to center for 45 degrees standard angle. Here problem was that the dowel would need 2 cuts on the same side to create arrow shape. The other option was not to go for 45 degree angle and shift the dowel a bit such that you would need only 1 cut. I chose the second option. With first only the center dowel (diagonal one) would be complex, rest would be easy, With second approach everything would be moderately complex.
- Measure angle between pencil marking and edge of the cabinet front to set your miter. Do this for each edge dowel connects with.
- Test you miter angle on a single dowel first. Align it on your pencil marking to see if it matches.
- After finding the perfect angle, now you should worry about length matching.
I shifted my center dowel a bit and made my angles 52 and 38 degrees. On miter saw you get 45 degree angle on either side. For any angle greater than that needs a simple hack. Get any other piece of wood with flat surface, cut it at 45 degree angle and place it against the scale. Now you have 45 degrees included in your calculation, move the miter to cover the difference. For example I needed 52 degrees, so I put 45 degrees precut wood then moved my miter by 7 degrees from the center in opposite direction to cut wood. Insert the wood dowel along cut wood and voila you have a 52 degree cut.
- For cutting I found it easier to have 2 sets. One with upward angle(left bottom to right top), one with lowered angles (left top to right bottom).
- While cutting length your miter would be at the center so cutting 8 pieces at once makes sense.
- For cutting angles you need to group by the angle rather than length, so that you can cut multiple pieces without changing the miter setting.
- One key thing to check here is if you are able to close the cabinet with this additional bulk. try building the cabinet and installing. If they get stuck along the way some where, means length of dowels is slightly higher, you can sand the excess down and it would work perfectly fine :) It is important to check this before painting.
- Ensure that you are getting primer between the gaps in the wood and that it is smooth
- Consistency of this primer is slightly runny so it can leave streaks.
- Before painting ensure that there is no dust/excess caulk/sanded particles on the cabinet.
- Be sure to have smooth even strokes. If you drag the brush forcefully across, it will leave streak marks on the cabinet.
- Use the angled part of the brush to get in between the wood gaps.


.jpeg)


Lovely hack! Even though it was your first attempt, it turned out so well.
ReplyDeleteThanks. I love it too :)
ReplyDeleteAaradhana technology is one of the leading manufacture of Wood Working machine.
ReplyDeleteIf you are looking for wood working machine in india, then you have to try aaradhana technology once.
Nice post thank you Tracey
ReplyDelete